Ham Bone Split Pea Soup

split pea

Let’s face it, most families don’t often make a bone in, baked ham on their weekly rotation of meals, but on special holidays it’s often the star of the show.

Thanksgiving was a just a few days ago and ham was on the menu at my sister-in-laws house. Since she didn’t feel like doing anything with the ham bone she wrapped it up, rang my doorbell and gifted it to me!

ham bone

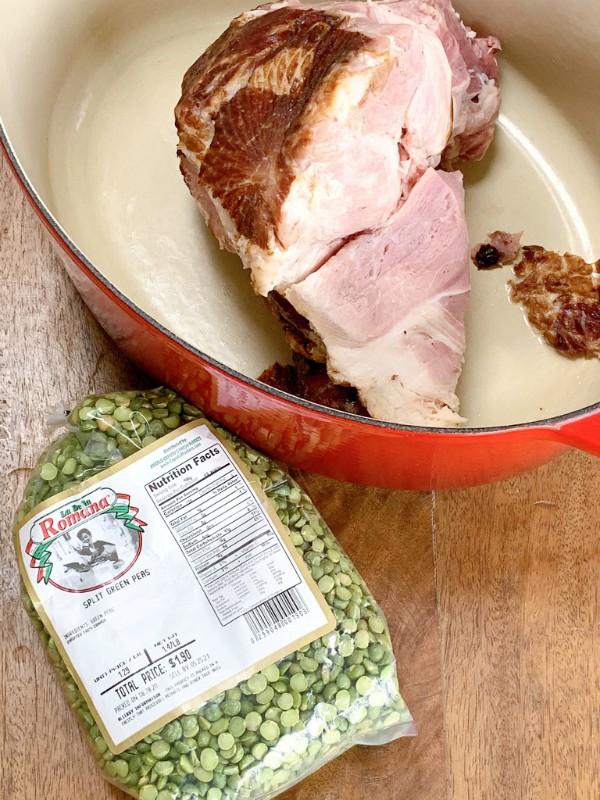
Lucky me, there was still a lot of meat left on the bone so split pea with ham was surely going to happen! If you’ve never made split pea using a ham bone, you’re missing out. It gives it a ton of flavor and elevates the soup to another level, even pea haters love this soup!

sofrito

Just a few ingredients to start the soup off, then it’s a nice slow simmer so all the flavors can meld together.

making soup

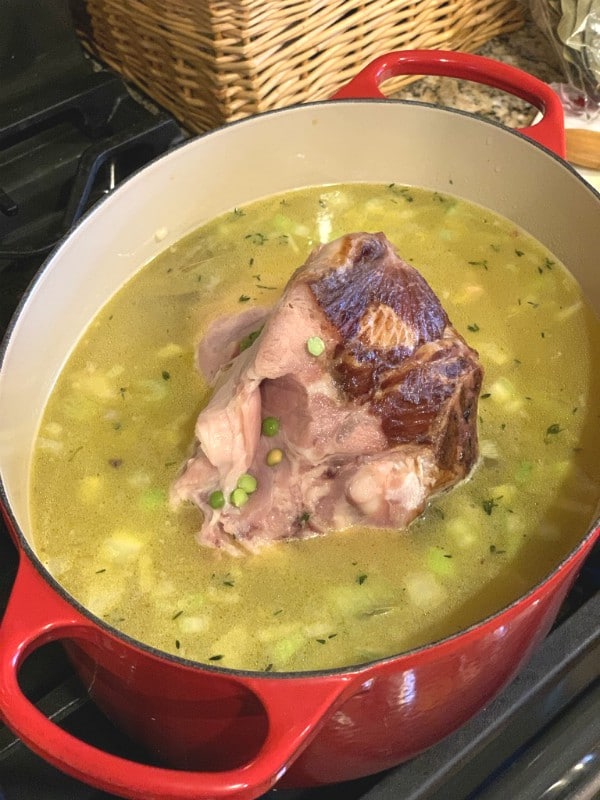
Grab a big pot with a lid and nestle the ham bone right into the center, then in a couple of hours you’ll be able to pick the meat off the bone.

pot of soup

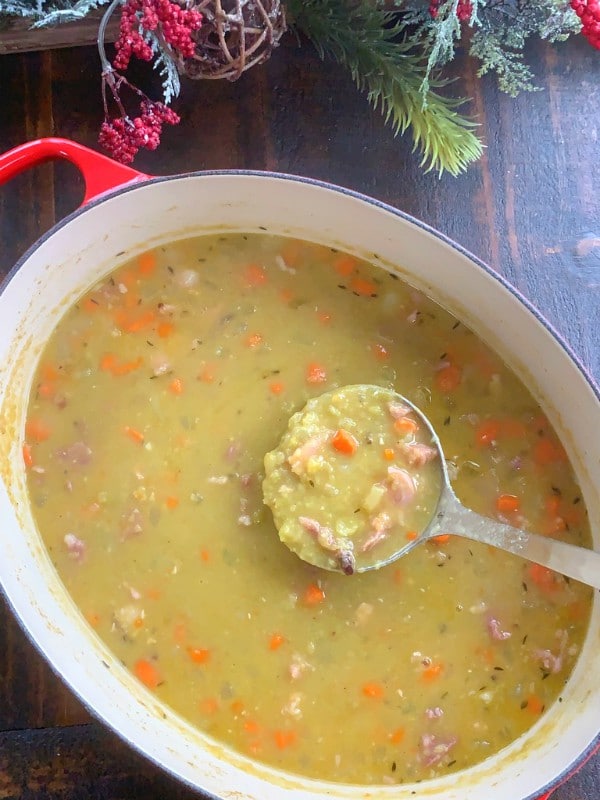
As you stir the soup while it’s simmering the peas will break down and become nice and creamy!

split pea

Just the smell of of this soup simmering on the stove makes your home feel all comfy and cozy, it’s such a hearty and satisfying soup.

croutons

Keep in mind, you need something crunchy on top for garnish. So if you have any leftover bread, please make your own croutons. I had some leftover ciabatta bread that I cut up in cubes, drizzled it well with olive oil, then sprinkled it with salt and pepper then into a 400 degree oven til nice and golden.

hearty soup

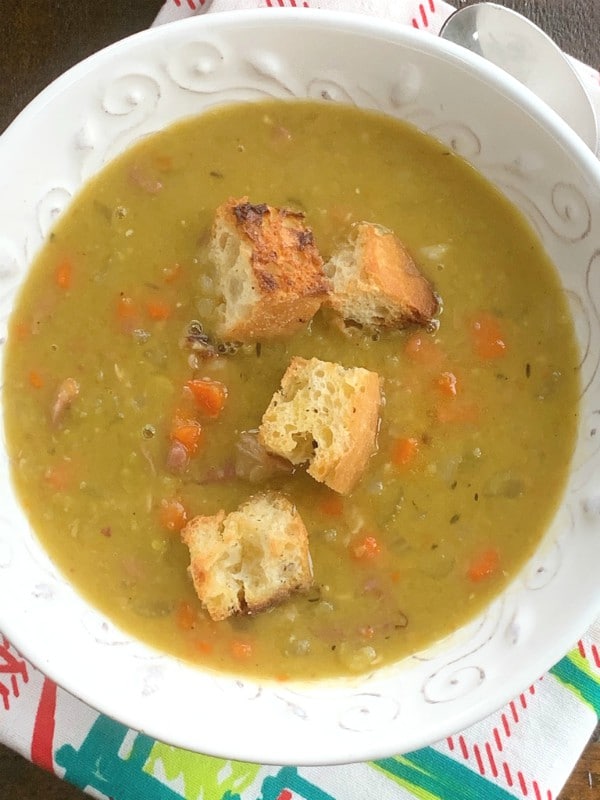
Crunchy croutons on top of such a hearty, creamy, smokey, meaty delicious soup, I could go on and on!

There are many variations of this soup, some add potatoes ,but I don’t think you need them at all. Some add bacon instead of a ham bone, it may be good, but it’s just not the same. There are vegetarian versions but today we’re not going there. Try this once with a ham bone and you’ll be hooked!

Ham bones freeze well so if you don’t feel like making this right away, tuck it into your freezer for when you do.

And lastly this soup freezes well, so don’t be afraid to make a big batch!

5.0 from 1 reviews
Ham Bone Split Pea Soup
 
Author:
Ingredients
  • 1 meaty ham bone, make sure to leave meat on that bone
  • 1- 1lb. bag of green split peas, rinsed well
  • 1 quart of chicken stock, low sodium
  • 5 cups, water ( more to thin out soup if it thickens too much later)
  • 1 large onion, chopped
  • 4 carrots, peeled and chopped
  • 4 celery stalks, chopped
  • 6 thyme branches, stripped
  • 2 large garlic cloves, minced
  • 2 bay leaves
  • olive oil
  • good knob of butter
  • salt and pepper to taste
  • Homemade croutons for garnish
Instructions
  1. In a large stock pot with lid, drizzle the bottom with olive oil and add the knob of butter.
  2. Throw in the chopped onion, carrots, celery and garlic, saute til soft.
  3. Add the split peas and stir well.
  4. Sprinkle in the thyme leaves along with the 2 bay leaves and a grind of black pepper.
  5. Hold off on the salt until the end for taste because some hams tend to be saltier than others.
  6. Pour in the chicken broth then nestle the ham bone right in the center.
  7. Add additional cups of water, stirring well, then bring it to a boil, reduce, and let it simmer with lid on almost covered completely.
  8. Cooking times vary somewhere between an hour and a half to 2 hours, mine took almost 2 hours on very low. The peas will break down and get nice and creamy
  9. Keep checking and stirring.
  10. When you start to see the meat falling off the bone, remove the bone, let it cool a little then start picking the meat off and placing the shredded meat back into the pot.
  11. Discard bone.
  12. Taste for salt, pepper and thyme, adding more if needed. Always stirring to check for thickness.
  13. If need be, add a little more water for a looser soup. It's up to you on how thick you want your soup.
  14. Garnish with homemade croutons.
  15. Use a hearty style bread, cut into cubes, drizzled with olive oil, black pepper and a touch of salt.
  16. Place into a 400 degree oven until crispy and golden, it goes fast so keep checking.
  17. Enjoy!


Print Friendly, PDF & Email
Signature

Butternut Squash Gnocchi with Sage and Brown Butter

squash gnocchi

Thanksgiving isn’t all about the turkey, yes turkey is all well and good, but to me Thanksgiving is all about the sides! One of my favorite sides are these butternut squash gnocchi.

I’ve been serving them for years at my Thanksgiving table. I normally make them a week or two ahead of time and have them tucked in my freezer until turkey day.

They may be small in size but not in flavor, they’re slightly sweet with the rich flavor of parmesan cheese running through every tender bite.

roasted squash

You start out by roasting your squash, roasting the squash adds to the depth of flavor, when tender and soft cool it down and then scoop out the pulp.

Next you’ll toss it into a food processor until it becomes nice and smooth without any lumps.

forming gnocchi

What I’ve learned over the years is that after processing the squash you’ll see that the squash holds onto some moisture, so a good thing to do is to toss the pureed squash into a sauce pan and cook it down until you see the moisture disappear, maybe five or ten minutes. When you cook some of the moisture out you won’t have to keep adding flour, which in turn could make them too heavy and doughy.

Then you’ll want to make sure to cool the mixture down completely before you start mixing in the flour and other ingredients.

NOTE: I always test my gnocchi before I form all of them. I boil a few just to see if they stay together, this will ensure you that your mixture is sturdy enough and they won’t fall apart and become mushy in the water. Sometimes you might have to add a little more flour. This is a very important step!


making gnocchi

No doubt making gnocchi is a labor of love but I can tell you it’s worth every bit of the time it takes, and remember you can make them ahead at your convenience.

butternut squash gnocchi

There is no ricotta or potato added to these gnocchi, it is straight up butternut squash that’s permeating  throughout these tender bundles.

boiled gnocchi

Gnocchi take very little time to cook, always place them into salted boiling water, as soon as they float up to the top they’re basically done. Never ever pour them into a big strainer, you need to hand scoop them out like shown in thee picture above. Gnocchi are very delicate.

pan of gnocchi

A quick toss into toasty brown butter flavored with frizzled sage, if you want you can add a touch of pasta water to loosen the sauce up a bit.

Brown butter sauce is the perfect compliment to these delicious gnocchi!

Thanksgiving plate

My Thanksgiving plate from years past where’s there’s always room for the butternut squash gnocchi, and I should say that the leftovers are just as good the next day!

5.0 from 1 reviews
Butternut Squash Gnocchi with Parmesan, Sage and Brown Butter
 
Butternut squash with hints of parmesan in every tender bite!
Author:
Ingredients
  • FOR THE GNOCCHI
  • 1 large butternut squash, around 3 lbs. roasted then pureed to yield 2 cups
  • 1 heaping ½ cup of grated Parmigiano Reggiano plus extra for garnish
  • 1 large egg, whisked
  • 1 teaspoon, salt
  • pinch of black pepper
  • 2 plus cups of all purpose, unbleached flour
  • FOR THE BROWN BUTTER SAUCE
  • 1 stick of unsalted butter
  • a handful of fresh sage leaves
Instructions
  1. Carefully cut the squash in half lengthwise, scoop out the seeds, drizzle each half with olive oil, salt and pepper and place onto a parchment lined baking sheet, cut side down, at 375 until tender and the tip of a knife goes through easily 40 minutes or so.
  2. Scoop the flesh of the squash out and place it into a food processor, puree until completely smooth with no lumps.
  3. Place pureed squash into a sauce pan on medium heat, stirring often to evaporate any moisture that might be showing up in the mixture.
  4. Next cool down that mixture completely, so place the pan into the fridge until completely cooled .
  5. Now you’re ready to start forming the gnocchi.
  6. In a bowl add the pureed squash with parmesan cheese, salt, pepper and egg.. Then add the flour little by little into the mixture and work together by hand. It will be very sticky, you might need to add more flour, or even less, just judge by the feel of the dough, you have to be able to roll it.
  7. Once smooth, flour the work surface, Divide dough into 6 pieces and then roll each piece into a long strip, about ½ inch wide. Cut the strip into ½ inch pieces.
  8. Using a gnocchi board, a fork, the back of a grater or just as is, to create ridges. Place each piece on floured wax paper and repeat with the rest of the dough.
  9. At this point you can freeze them in single layer until solid frozen then place the gnocchi into zip lock bags until ready to use.
  10. When ready to eat, have a large pot of salted water going, when boiling add the frozen gnocchi, (don't let the water boil so so hard, lower it a bit) when they float up to the top, they’re pretty much done, but you can test one to make sure. Always take them out of the water with a hand strainer like a Chinese spider, never pour them into a big strainer, gnocchi are delicate.
  11. You don't ever want your gnocchi to blow up and over cook, they should have a little bite to them.
  12. While the gnocchi is in the water cooking make your brown butter sauce by melting the butter over medium heat, when it starts to to smell nutty and turn golden brown toss in your sage leaves and let them fizzle.
  13. Take your gnocchi from the water with a hand strainer, gently and place them into the brown butter sauce, tossing till covered, If you want to loosen the sauce up a bit, add a little pasta water, then add more parmigiano.
  14. They're ready to eat now!


Print Friendly, PDF & Email
Signature

Cauliflower and Sausage Stuffing

cauliflower stuffing

Thanksgiving is only a couple of weeks away so it’s time to start talking and planning the big meal and side dishes. Do you have anyone you might be serving this Thanksgiving who is gluten free, keto or doing low carb, if so this is a great option.

Last year I made this cauliflower and sausage stuffing for a gluten free family member, not only she enjoyed it but everyone that tried it loved it, it definitely satisfies your stuffing desire.

It’s made similar to my traditional stuffing with all the same flavors going on except cauliflower florets replace the bread, but the nice thing is you’ll still get crispy bits along the edges ( my favorite part), with fresh and dried herbs mingled between the sausage and all the veggies.

low carb stuffing

I’ve always added breakfast sausage to our stuffing, preferably one flavored with extra sage, it’s tradition over here, so that’s what I’ve added in this cauliflower stuffing.

Feel free to add your favorite type of sausage or eliminate it all together. I do however suggest that you add in some mushrooms as I did to punch up the flavor and give it more bulk.


gluten free stuffing

There’s a little bit of prep before like browning the sausage and a quick saute of the veggies, but as far as the cauliflower goes you can toss it in raw as long as the florets are in bite size pieces.

Everything then goes into as buttered casserole dish, like a traditional bread stuffing. This can all be prepped a day or two ahead then popped into the oven with the rest of the other sides on the day your serving it.

cauliflower and sausage stuffing

When it comes out it looks like this, crispy and golden. The cauliflower takes on all the traditional flavors of a bread stuffing but without any bread!

A delicious option for all to enjoy!

Cauliflower and Sausage Stuffing
 
A nice option for those who are gluten free and those preferring to eat less carbs.
Author:
Ingredients
  • 1 good size medium cauliflower cut into bite size florets
  • 1 lb. breakfast sausage like Jimmy Dean or Bob Evans, in bulk
  • 1 large onion, diced
  • 4 or 5 celery stalks, diced
  • 8 oz. baby bella mushrooms, sliced
  • 3 garlic cloves, crushed
  • 1 stick of butter
  • ½ to ¾ cup of chicken stock
  • handful of chopped parsley
  • dried sage, thyme, poultry seasoning (optional) salt and pepper to taste
  • Fresh sage leaves for garnish
Instructions
  1. Butter the inside of the casserole role dish you'll be using
  2. In a large skillet place remaining butter until it melts then saute the onions, garlic and celery until soft, then add the sliced mushrooms for a couple of minutes.
  3. Place all the sautéed veggies into a large bowl.
  4. Next brown up the sausage in the pan, breaking it up with a wooden spoon and cooking it until you see no pink.
  5. Drain the sausage on paper towels then toss it into the bowl with the sautéed veggies.
  6. Fold into the bowl the bite size cauliflower, raw. If you think its to big you can toss it into the skillet for a couple of minutes to take the rawness away.
  7. Add in the chopped parsley.
  8. Add in the spices, dried sage and thyme and poultry seasoning if using into the mix. Start with 1 teaspoon each and then taste for your preference, adding more if you like plus the salt and pepper.
  9. Place everything into the buttered casserole dish, then distribute the broth all around.
  10. Top with a few fresh sage leaves for garnish.
  11. At this point it's all prepped and you can refrigerate it 1 to 2 days ahead.
  12. When you’re ready to serve, heat oven to 400 degrees.
  13. lightly foil the dish for 15 minutes then remove the foil and continue roasting until cauliflower is tender, golden, the sausage edges have crispy bits.
  14. Ovens do vary so keep checking every 15 minutes or so, you can also stick it under the broiler for a few minutes at the end to get desired golden look if needed.


Print Friendly, PDF & Email
Signature