Antipasto Potato Salad

antipasto with potatoes

This is the season for outdoor cooking with BBQ’s, picnic’s, parties, graduations and all sorts of get-together’s. As you can see from my previous few posts lately, I’ve been on a salad kick.

This antipasto potato salad is perfect for any of those occasions, I think you’re going to love it!

This is not your traditional American potato salad made with mayo, which by the way I think is delicious too. This one is called an antipasto potato salad because it’s filled with ingredients you would find on a nice big antipasto platter with the addition of potatoes.

antipasto salad

For the potatoes I used a mix of red and white thin skinned potatoes because that’s what I had, but you can use your favorite kind just don’t use a baking potato or a russet. I also left the skin on but you can certainly peel the skin off as well.

antipasto and potatoes

This is such a nice Italian twist on traditional potato salad, it’s dressed with a delicious red wine vinaigrette so you can put this out and serve it worry free in regards to spoiling because no mayonnaise is required.

Enjoy!

Antipasto Potato Salad
 
Think of a nice big Italian antipasto salad, add some cooked potatoes and this is the delicious result. This recipe is adapted from Delish
Author:
Ingredients
  • 2 lbs. of cooked red or white skinned potatoes, cooked until a knife goes through easily, cooled then cut bite size. ( you can peel them if you like)
  • 1 cup of salami, sliced. into quarters or diced
  • 1 can or jar of artichoke hearts, drained of liquid
  • 2 cups sliced cherry tomatoes
  • 1 container of bocconcini mozzarella, or the pearl size, drained of liquid
  • ½ red onion, sliced in half moons
  • a mix of olives, I like kalamata and castelvetrano, a cup or more
  • a handful each of fresh parsley and basil, chopped
  • VINAIGRETTE
  • ½ cup of good extra virgin olive oil
  • ¼ cup red wine vinegar
  • 2 small garlic cloves, grated
  • 1 dollop of Djion mustard
  • oregano and salt and pepper to taste
Instructions
  1. Shake the dressing in a jar.
  2. Place the salad ingredients into a big bowl, tossing in the herbs.
  3. Then arrange and place everything onto a big platter and spoon desired amount of the dressing over the top right before serving.
  4. Toss gently.


Signature

Paccheri Pasta and Some Party Ideas

This is the perfect side dish to all your grilling, individual little bundles of cooked Paccheri pasta stuffed with roasted vegetables, cheese and sun dried tomatoes. Tastes best when served at room temperature with a fresh herb, lemon, olive oil and parmesan dressing drizzled all over the top, great to bring to a party or picnic!
Equally as good is the caprese version using sliced tomato, fresh mozzarella and basil all tucked inside with an olive oil and balsamic glaze drizzled all over the top!

Paccheri pasta are large hollow tubes shaped similar to rigatoni only bigger and wider.

I roasted planks of zucchini and eggplant and then tucked in some asiago cheese and a sun dried tomato for mine.

Just cook the pasta according to the package, let it cool, then stuff them with whatever inspires you!

I had some leftover cooked pasta so I decided to stuff the remaining ones using a zip lock bag filled with spinach, ricotta, lots of grated cheese and an egg. Fill them and stand them straight up, side by side until you fill the pan, adding sauce on top and in between.

I have several mini spring form pans which I love to use and often do for an individual take on this dish.

Olive oil and brush with sauce the bottom and sides of your mini spring form pan, I have a 4″ pan. I’m sure you could use a larger one if you wanted to, but I think the smaller ones are cuter and they come out looking like a little flower!

And here’s something for dessert that will surely have your guests talking! Vodka infused whipped cream! It comes in many different flavors, we had the chocolate and vanilla. It works just like traditional whipped cream, but only for grown ups!

My daughter brought this over on the fourth of July, it was quite a hit!

Extremely good with strawberries or grilled fruits of any kind, top off your cup of coffee with it, or squirt some on a piece of pie. Use your imagination and enjoy!

Buon Appetito!
Signature

Grilled Veggie Torte Revisited

Some things just need to be revisited, they’re worth repeating especially when you change them up a bit, such is the case with this Grilled Veggie Torte. My inspiration for making this first hit me a few years ago when I saw this layered beauty in the case at my local Whole Foods store. I asked them how they made it, was there any cheese between the layers? I was in awe of it’s cake like structure and the beauty of it. It was made in a spring form pan piled high with veggies and feta cheese in between, I instantly went home and tried to recreate it, since then I have made it several times for parties, to bring along to a friends house or just when I want to use up an abundance of veggies like I did here. It’s very impressive looking and it can be made in any size pan, the one in my previous post was a 6 inch pan, the one here was a nine inch.
The more colorful you make it the better it is, that’s what gives it the wow factor. I used green, red, yellow and orange peppers, vadalia onion rings, zucchini, eggplant and portabello mushrooms tossing torn fresh basil in between. Feel free to use any of your favorite veggie combinations.

In previous times I have put feta cheese, shredded mozzarella, parmesan or asiago between each layer and on top. Grilling all your veggies do take some time so feel free to grill them the day before and just assemble it on the day you bake it. Remember to brush them all with olive oil and season with salt and pepper before grilling.

Then the other day my friend Stacey posted a beautiful Grilled Vegetable Torte with a crispy and cheesy breadcrumb topping on it and I was inspired to make her version ASAP! all I can say is that the topping enhanced the over all deliciousness of the torte! Check out her beautiful version here.
I also added sliced garden tomatoes on one layer after seeing hers. I made my crispy topping with homemade bread crumbs, grated romano cheese, snipped basil, salt and pepper, and a generous drizzle of olive oil on the top. The two new additions were incredible!
Bake it at 400F for about a half hour. The key is to let it really cool down before you pop the spring on the pan and you will have no problem cutting it into perfect wedges, just make sure you use a serrated knife and slowly cut through it.
The torte can stand proudly alone as a vegetarian meal along with a salad or it’s a wonderful side dish with any type of grilled meat. I served mine with this chicken above. A great summer meal indeed!

Buon Appetito!

Signature

Grilled Polenta

Over Memorial Day weekend I grilled a pork roast Tuscan Style and served this grilled polenta as one of my side dishes, it went perfectly together. What makes this polenta extra special in flavor is the addition of shredded zucchini and grated cheese that gets folded in at the end.

Then for even more flavor, a roasted tomato is added on top of each slice so that when you cut into it everything mingles together and makes perfect harmony.

I used roma tomatoes, and after slicing off the tip and a little off the bottom I cut them into thirds, added a piece of shaved garlic on each, along with salt, pepper and dried oregano and then a generous drizzle of olive oil. Roasted in a 400 degree oven on a baking sheet lined with foil until wilted but still juicy. This can be done the morning of.

To shred your zucchini use either a box grater or a food processor as I did.

Next, you have to squeeze out all the liquid from your zucchini, a task I’ve always hated to do until I saw this brilliant way to do it on my friend Debby’s blog.

If you have a potato ricer laying around that you rarely use like I did, get it out and dust it off it will be your new best friend in the kitchen, if not, go out an get one it will make your life so much easier! I was amazed to see how much liquid came out when I used it, the zucchini was practically dry! It sure beats squeezing it with a towel or by hand, she even says it works great for spinach as well.
After your zucchini is squeezed out you’ll need to saute it in a pan drizzled with olive oil, cook it until it’s not raw anymore, it only takes a couple of minutes.

Cook your polenta according to directions and when it’s finished fold in the cooked zucchini and a generous amount of grated parmesan or romano cheese. I used a half a box of polenta and 3 zucchini.

Spread the mixture into a rimmed baking sheet that’s been brushed lightly all over with olive oil, I used a quarter sheet pan and it worked perfectly. Spread the warm polenta evenly all over the pan and smooth it down with a silicone spatula. After it cools down a bit cover with tin foil and refrigerate it preferably overnight. I would suggest doing this all the day before because you really want the polenta to be cold when you go to cut into it.

When you pull it out of the fridge and take the foil off you might have a tiny bit of condensation on top, no worries, just dab it with a paper towel. Now you’re ready to cut your polenta into squares.

Heat up your grill and make sure it’s super clean, then take a paper towel soaked with canola oil or vegetable oil and rub it all over your grates. Place your polenta squares on and wait until you see some good grill marks appear then flip over and do the other side. I have an olive oil sprayer so I sprayed a little on top of each before I flipped them over. I also had my grill on medium heat, you don’t want them to burn!

When done they should look like this! They hold their shape really well and look very nice when put together and placed on a platter.

They taste best when served slightly warmed. Now wouldn’t you like to bite into these?

Happy grilling!

Signature

Cauliflower Sformato

Sformato is a molded dish, usually a vegetable of some sort mixed in with a bechamel parmesan cheese sauce that turns into a light and fluffy almost custard like souffle. In this case I used cauliflower, but you could also use zucchini, spinach, asparagus, artichokes, and mushrooms, just to mention a few. The same thing goes with the sauces, the possibilities are endless!

I saw this awhile back on Linda’s blog and wanted to make it then, but never got around to it until recently when I saw it again in the recent issue of La Cucina Italiana magazine. In the magazine they used a ring mold which gave a pretty presentation but I didn’t have one so I just used my 6″ spring form pan which has deep sides, and that worked out very well.

Essentially you cook up your cauliflower then pulse it in a food processor, mix it in with your creamy savory custard sauce, season everything, place it in your mold and bake. The recipe says to boil your cauliflower, drain it, then squeeze out the excess water, I found that roasting it until tender was easier and I didn’t have to squeeze anything out, just make sure you don’t caramelize your veggies. I roasted mine at 375F but I was watching it often by pulling it out and checking for doneness. Here’s the link to the recipe, also before I placed it in the oven I sprinkled parmesan all over the top. I served mine with a light marinara sauce, it was delicious!

I hope you give this a try, be creative, you’re going to love it!
Buon Appetito!!
Signature

Holding On To Summer with A Tomato Bread Pudding, and an Opened Faced Tomato and Egg Sandwich

Looking for more ways to use up your summer tomatoes? Here’s 2 recipes you have to try! Tomato Bread Pudding. The minute I saw this flipping through the pages of Amy Goldman’s book ,The Heirloom Tomato, I was inspired to make it. I loved the idea of a savory tomato bread pudding. Think toasted ciabatta cubes tossed in a tomato and herb cheesy custard! What a great side dish this is, we loved it! and I know I’ll be making this again!

Although I do remember all the ingredients, I don’t own Amy’s book, so I can’t give you the true recipe, but I will give you my version of what I did. I cut up and cubed half of a ciabatta loaf, put it in a 400F oven till crispy. In a large bowl I diced 4 tomatoes, added fresh parsley, thyme, and rosemary. Next I added in the same bowl 1/2 cup of half and half, and 1/2 cup of milk, 2 eggs, 1/4 cup of grated asiago, and 1/4 cup of grated romano cheese, salt and pepper.

In a small pan saute 1/2 onion and 2 garlic cloves.Toss this into the bowl with the tomatoes. Place your bread cubes in a buttered baking dish and pour the custard mixture all over covering the cubes, let it all absorb. Place grated romano all over the top and drizzle with olive oil. Bake at 350F in a larger baking dish filled halfway up with water, 25 minutes. Brown under broiler.

Opened Faced Tomato and Sunny Side Up Egg Sandwich

This is great for a weekend morning breakfast. The picture pretty much explains the recipe.

Crunchy toasted bread, slathered with pesto, topped with a hefty slice of your favorite tomato, then topped with a fried egg. Simple concept, extrordinary taste!
I hope you get a chance to try these! Have a great Labor Day weekend and Buon Appetito!

Signature

Party Sides!

These salads are great side dishes for parties, they can be made ahead of time, served cold or at room temperature. Have you ever tried pearl couscous? Larger than regular couscous, they look like tiny little pasta pearls. Just cook according to directions , and cool down by rinsing with cold water.
Place in a bowl and toss with a fresh lemon and olive oil dressing. Here I added red onion, chopped cucumber, kalamata olives, grape tomatoes, fresh chopped parsley and basil. Salt & Pepper.

This carrot salad is a combination of finely chopped red onion, chopped parsley, garbanzo beans, and pine nuts, tossed in a red wine vinegar and olive oil dressing. The carrot strips were done with a vegetable peeler, this is raw not cooked. Salt & Pepper.

For this broccoli salad you’ll want to blanch the broccoli florets for about 3 minutes in boiling water, then cool down in ice water and drain. Add chopped red onion, kalamata olives, diced red pepper, and crumbled feta, add salt, pepper, and a little granulated garlic. Toss in some olive oil.
If you want, you could add lemon, but it tastes good with out it too.

Wishing you all a wonderful weekend filled with family, friends and food!
Marie
Signature

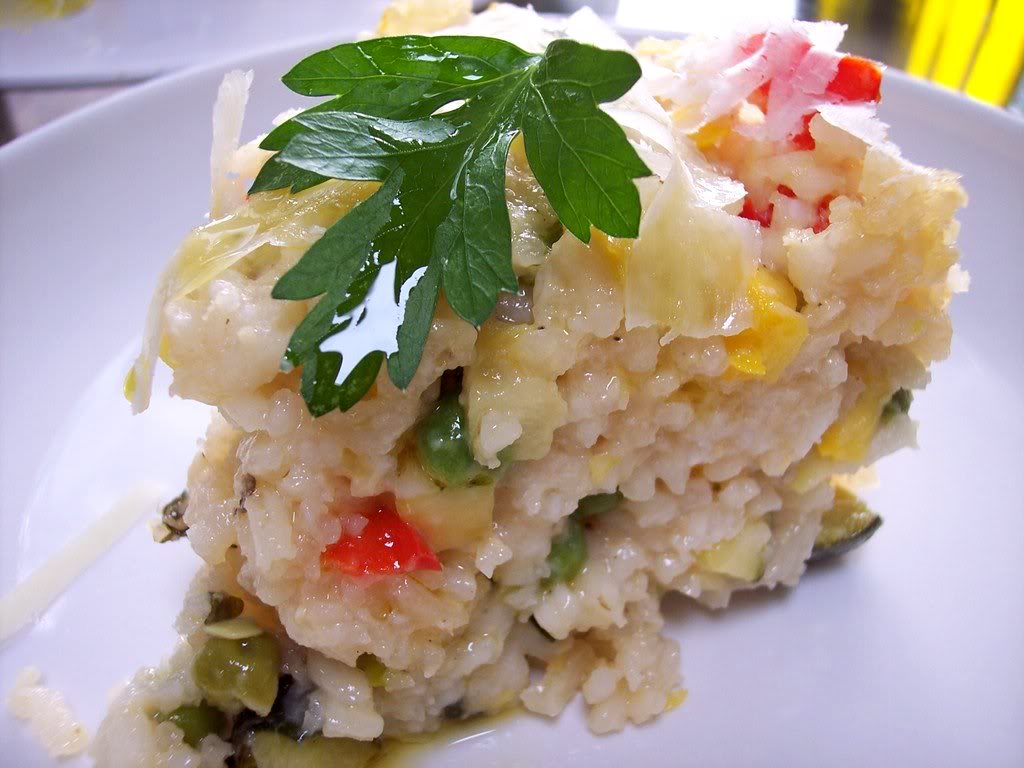
Risotto Primavera Cake!

I’m beginning to see a trend in my cooking. I’ve noticed I have a fondness for molded foods! No really! Check it out! Here, here, here, here, and here. And now I’m adding this one to my list! I must surely have a problem!!!

I started molding risotto about 10 yrs ago in my green Tupperware Jello mold, you know the one with the whole in the center. I read it somewhere in a magazine many years ago and I thought it was the coolest idea, especially for a dinner party as a side dish, I just liked the idea of cutting off a piece that was all contained, it has a nice presentation.
Believe me I don’t do this all the time, we like our risotto the normal way, slathered on our plates too, but for something a little different and out of the ordinary, you might want to give this a try.

The other thing I like about this is the fact that you can make your risotto the day before, have all that stirring done, and your kitchen cleaned up! Use any combination you like, you know risotto’s a personal thing. Put together the ingredients and flavors you enjoy!
I did a primavera, because I had alot of veggies I wanted to use up. In mine I used zucchini, yellow squash, red and green pepper, mushroom, onions, and pea’s. I added to it, fresh parsley and basil, salt, pepper, and grated romano cheese.

The key here is that you use a little less liquid than normal, so it will have a drier consistency, but still be very moist and creamy. The other thing I do is saute my veggies first in another pan and set aside. I don’t like my veggies overcooked and mushy, so when the risotto is finished absorbing all the liquid, thats when I’ll fold my veggies in.
Grease your mold, here I used a springform pan. Pour your risotto mixture into it, make sure you press it down with the back of a spoon, then wrap in foil and refrigerate it! If you’re making it the same day, still keep it in foil, but bake it in a 400 degree oven for about 30 to 35 min. Let it sit for about 5 min’s, then un mold. You can serve this hot, cold, or at room temperature.

The important things to remember are, for every 1 cup of rice use 2 1/2 cups of stock, and don’t forget to deglaze with a shot of wine, finish it off with a little butter, and the cheese. and don’t forget you’re going to bake it for about a half hour.
Other than that you could use any risotto recipe you like.
Any one else seeing a trend in their posts?
Buon Appetito Everyone!!

Signature

PASTA SALADS!

ORZO WITH GRILLED SHRIMP AND FETA
INGREDIENTS
Grilled shrimp (marinate the shrimp in lemon peel, lemon juice, olive oil, crushed garlic, then grill)
Cooked orzo pasta
Diced and seeded English cucumber
Diced red onion
Crumbled feta
Fresh lemon and lemon peel
Mint, parsley, a little oregano
Make a vinaigrette by whisking olive oil, fresh squeezed lemon juice, a little crumbled feta, salt and pepper,and white wine vinegar, and a crushed garlic clove. Taste it to your liking either adding more or less.
Place all ingredients in a bowl, adding all the herbs, more feta, (make sure it’s in small crumbles)pour your vinaigrette over all the ingredients, taste it and make sure you have enough of everything! Adjust it to your liking.
BOWTIE CAPRESE
INGREDIENTS
Cooked bowtie pasta
Grape tomatoes sliced in half
Fresh mozzarella cut in chunks ( I used a dry pack)
Fresh basil
Place everything in your bowl and coat with good olive oil, salt and pepper
The juices will come out of the tomatoes and flavor the oil and give a great taste to the salad.

These salads are great for any party, lunch with the girls (or guys), BBQ’s, and picnic’s.
Hope you give them a try!
Buon Appetito!!

Signature

SLOW-ROASTED BALSAMIC GLAZED ONIONS

Although this takes about 2 hours to make, I guarantee you wont mind it, because it fills your home with a wonderful aroma, and besides, the oven is doing all the work!

I got this recipe out of an Italian magazine a couple of years ago and loved it because it goes great with any kind of grilled or roasted meats. Simply brush some thickly sliced onions with olive oil, and season with salt and pepper, place in a shallow pan and cover with foil. Roast for 45 min. at 350 degree’s F. Then uncover and roast them for another 40 min.

You’ll want to use a good balsamic that has been aged for at least 10 yrs. If you don’t want to pay an arm and a leg for a bottle Trader Joe’s has a great one( another plug for TJ’s!!) but I’m certain you can find some readily available other places.

Once the onions are tender transfer to a platter, and pour your vinegar right into the pan on top of the stove, and on medium heat let it simmer till thick, always moving it with a rubber spatula to scrape up the brown bits.
It didn’t take very long to become rich and syrupy. because of the quality of the vinegar.

Stir in some toasted almonds to add a little crunch, and spoon it all over the onions. The flavor is unbelievable!!!

Buon Appetito!!!

Signature